← Back to Getting started with Visual Category Merchandising
Introduction to Scheduled Campaigns
In a campaign, you can configure one or more categories, each with a set of boosting rules, pinned products, and also a set of products excluded from it. It is called a scheduled campaign as it is possible to activate them for a particular duration in the future.
Adding Scheduled Campaign Rules
Scheduled Campaign Rules will be applicable for the campaign only.
- Under Visual Category Merchandising → Scheduled Campaigns, click on the Create New button
- You will see a Category selection popup. This has been introduced to lock the categories that you wish to merchandise. Select the categories that you want to merchandise and click on Proceed. (Read more about Category Locking feature here)
- Choose a Category from the category drop down to start creating rules for it. Once you have selected a category, you should see the products of that category on the right.

- By default, the default rules created for the selected category are inherited and enabled for the new campaign. However, you have a choice to disable some or all of them for this campaign.
- From the left side panel, within Scheduled Campaign Rules, click on the + button to add a new rule.
- Here, you can specify one or more product attribute conditions to choose a set of products to boost or deboost. The interface also allows you to create individual groups (the Add Group button) of such conditions and then specify AND or OR condition between these individual groups.
- Once these conditions on product attributes are specified, use the slider to assign a boosting score or enter a score manually.
- To Boost, use score (an integer value) between 1 and 999 where 999 is the highest boosting score (i.e. maximum promotion).
- To Deboost, use score (an integer value) between -1 and -999, where -999 is the maximum deboosting score (i.e. maximum demotion).
- Click on the Apply button to see a preview of the category page with all the boosting rules (created until that moment) to be applied.
Copying Rule to Other Categories
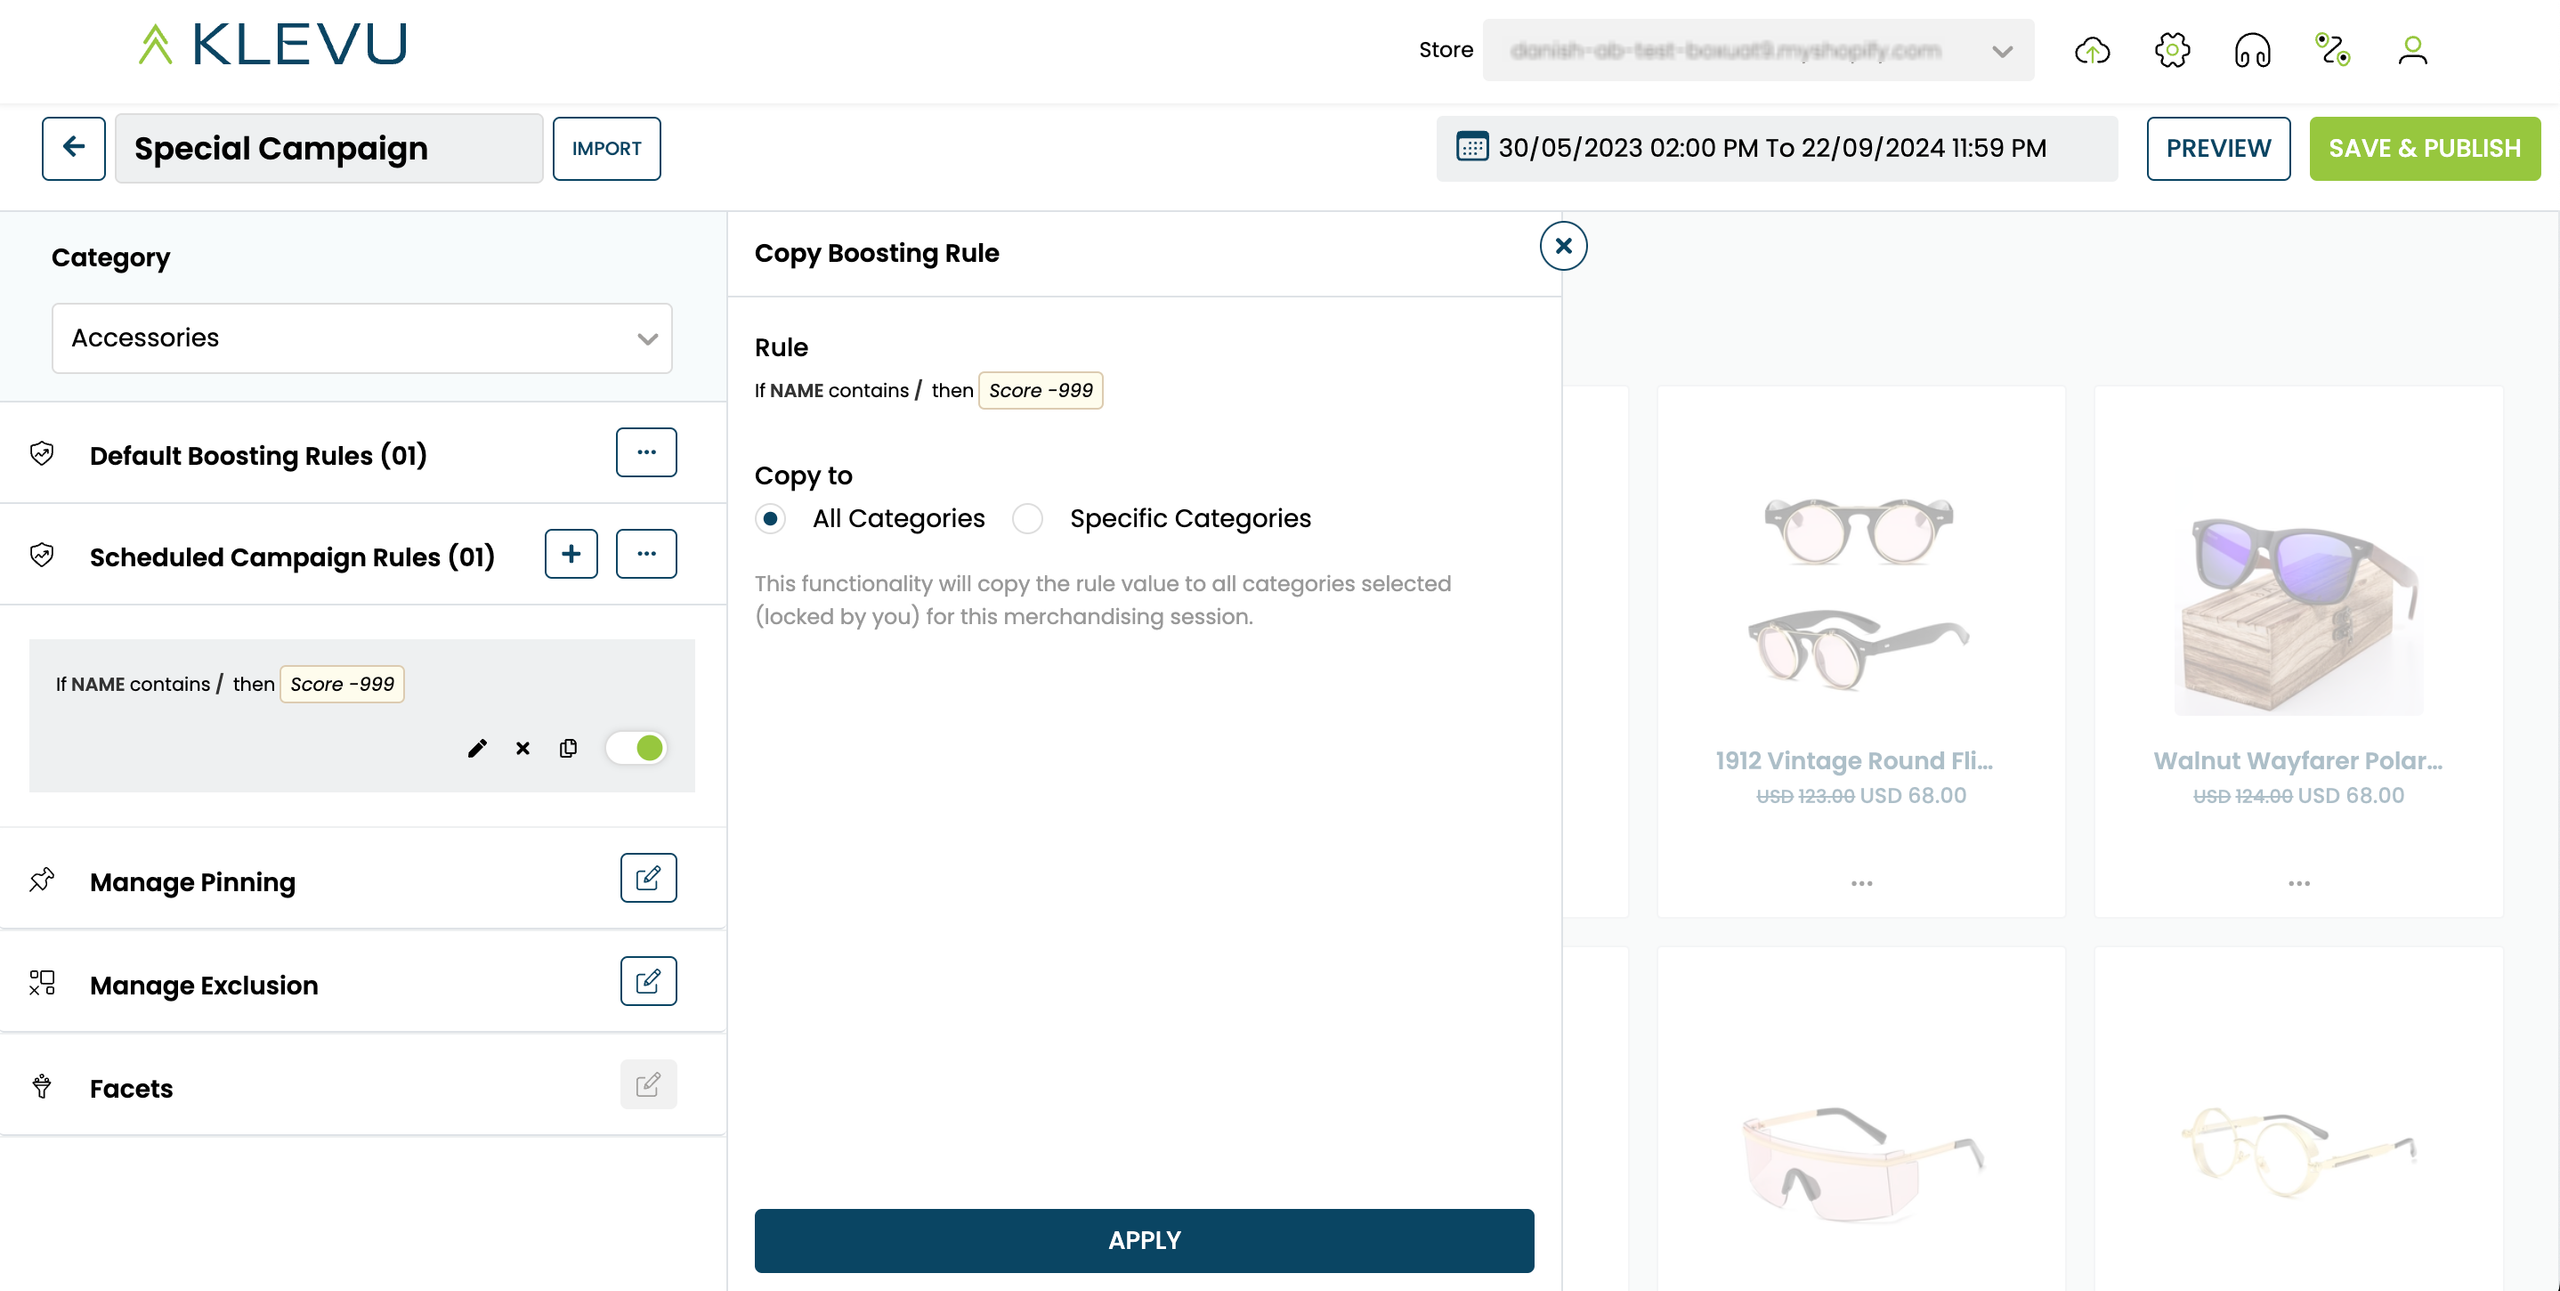
- Once the boosting rule is created, you can copy it to other categories in the came campaign by clicking on the Copy Rule icon
- You can copy the rule to All Categories or to Specific Categories that you had locked while selecting categories to merchandise (Learn more about locking categories).
Pinning Hero Products
- If you want to show a few selected products at the top of a category page (i.e. first products in the product listing), the VM tool allows you to "pin them to the top". Simply hover your mouse on a respective product and click on the "pin" icon. This will move the “pinned” product at the top of the page.

- It is important to note that the pinned products take the first few spots on the respective category page. The other products (i.e. not pinned) are then organized as per the other applicable boosting scores and/or their self-learning score as computed by the Klevu search engine.
You can also pin multiple products by selecting them using the product selector and using the PIN SELECTED option under ACTIONS.

To unpin a product, simply hover over the already pinned product and click on the pin icon to unpin the product.
Additionally, you can pin more products and manage the ones already pinned from the Manage Pinning section.
Managing Pinned Products
- Manage your pinned products by clicking on Manage Pinning menu from the left side panel to pin more or manage existing pinned products.

- In Manage Pinning section, you can see two tabs.
- Pin products - From here, you can pin products either by viewing all products or by searching for specific products.

- From this tab, you can:
- Pin more products by selecting them
- Search & pin products
- Unpin already pinned products
- From this tab, you can:
- Order products- From here, you can view and manage already pinned products.

- From this tab, you can:
Drag & drop existing pinned products in the desired order
Reorder products using the number re-ordering input
Unpin products individually or by selecting multiple pinned products
Find Out-of-Stock or deleted products (at the end of the list)
Perform following actions by clicking on three dot
Unpin All Pinned products
Unpin All Search results
Unpin Selected products
Unpin Out of Stock
Unpin Disabled/Deleted products
Move products to Top or Bottom by selecting multiple products
- From this tab, you can:
- Pin products - From here, you can pin products either by viewing all products or by searching for specific products.
Once you have made the changes, you can preview those changes by selecting the APPLY button.
If you want to pin multiple products in single click, you can use the Bulk Pinning option (see below).
Bulk Pinning
- From the Manage Pinning section, choose the Bulk Pinning
 option to pin multiple products at once. This will open an editor.
- You can pin products in bulk by selecting SKU(s) or Klevu Product ID(s) in the editor screen.
- After making your selection, ensure that each SKU or Product ID is entered on a new line.
- Click Pin Products will validate all the entered SKUs/ Product IDs and pin (append) them after the existing pinned products. Note that the pinning order will follow the order as they have been listed.
- You will also be able to see how many products were successfully pinned, and any others product that were either skipped or not found with a downloadable report.
You can pin as many products as you want; there is no limit to the number of products you can pin.
However, it is advisable to pin up to 1,000 products at a time for bulk pinning. We recommend breaking down bulk actions into manageable batches to prevent system strain.
Excluding Products
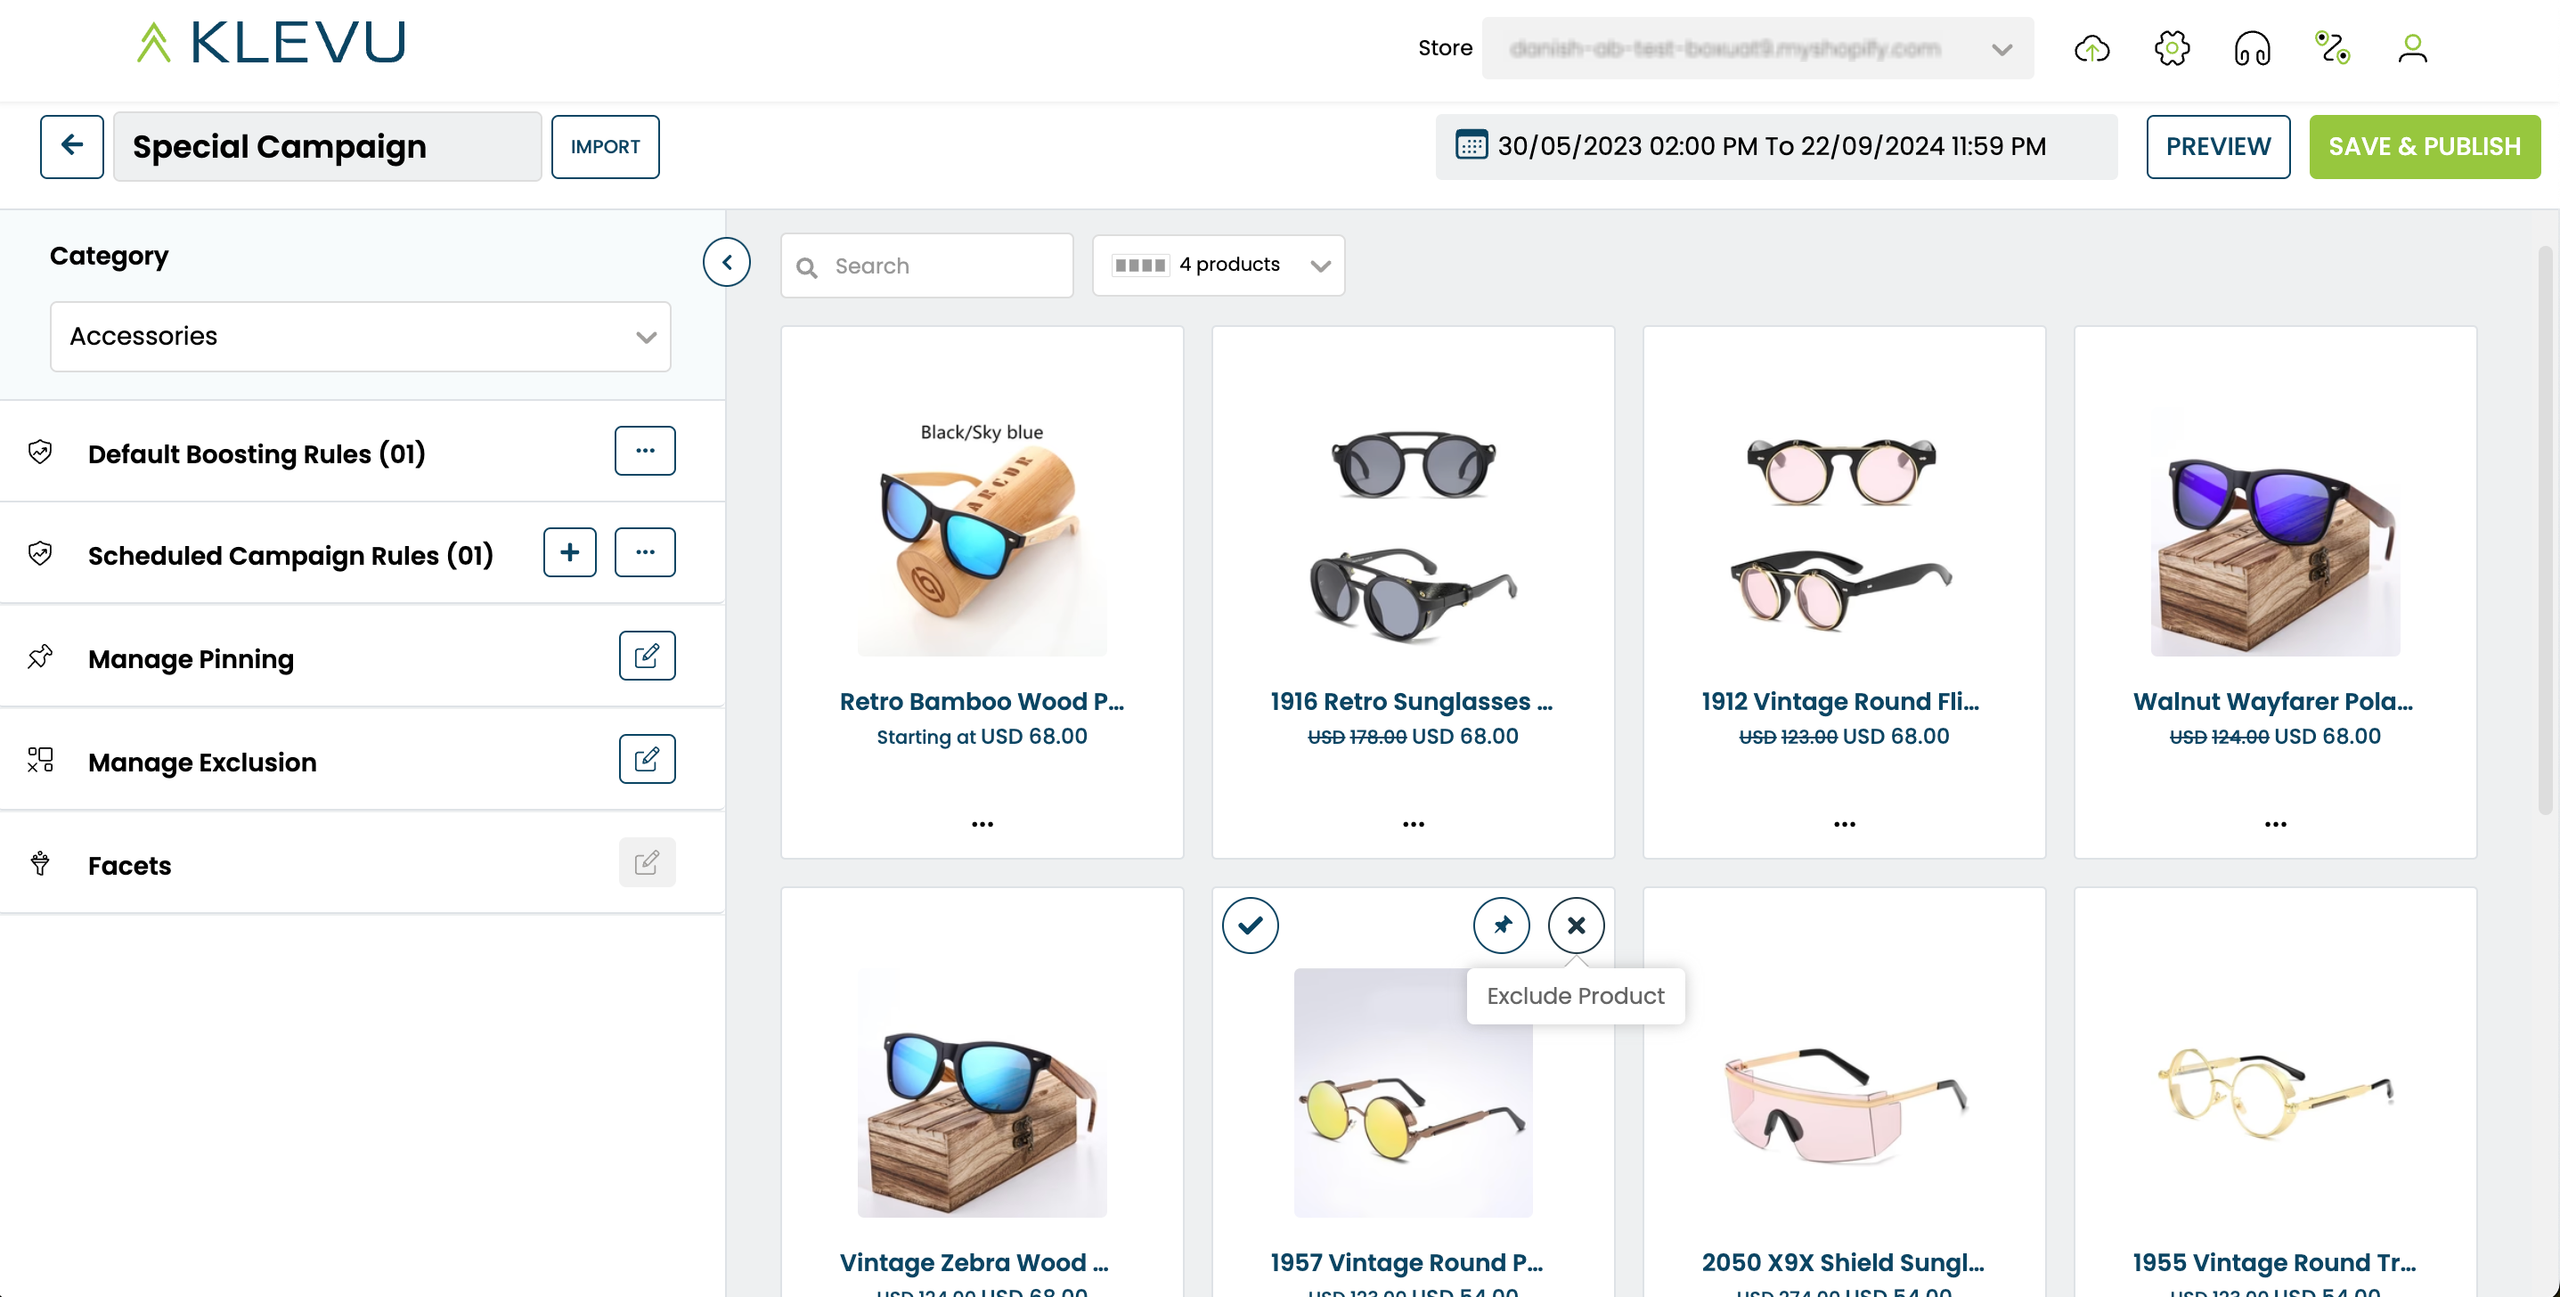
- To exclude a product from the category page, from the preview product grid, hover over a card and click on the Exclude icon. The product will disappear from the current product listing.
You can also exclude multiple products using the product selector and choosing EXCLUDE SELECTED from the ACTIONS menu.
To include such a product back into the product listing, visit the Manage Exclusion section in left side panel to include it back.
Managing Excluded Products
Click on the Manage Exclusion menu from the left side panel to exclude more or manage existing excluded products. A separate section will open, displaying the excluded products.
In the Manage Exclusion section, you can see two tabs.
Exclude Products - From this tab, you can:
Exclude more products by selecting them
Search & Exclude Products
Include already excluded products
Include Products - From this tab, you can:
Include products individually or select multiple excluded products to include
By clicking on the three dots, you can perform the following actions:
Include All Excluded products
Include All Search results
Include Selected Products
Remove Out of Stock products
Remove Disabled/Deleted products
After making all the necessary changes, preview them by selecting the APPLY button.
You can exclude products in bulk using the Bulk Exclude functionality by entering SKU(s) or Klevu Product ID(s) similar to Bulk Pinning.
Scheduling Campaign
- Click on the Scheduling button on the top right corner and select the appropriate time zone, date, and time in which you want this campaign to run.
 >
>
Publishing Scheduled Campaign
- Once you have created boosting rules and pinned the needed products, you can click on the Save & Publish button to see the changes in effect on the category pages on your store
Please note that it may take up to 20 mins to reflect the changes on your store front.